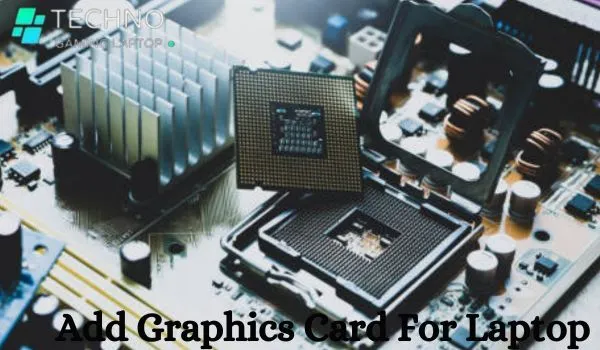
For gamers, a strong graphics card is vital. It gives you top-notch game flow and awesome images. Sure, home computers let you change parts easily. But many gamers use laptops. They’re portable and easy to use. Now, you might want to boost your laptop’s game power. Can you add a graphics card to your laptop? Yes, you can. This guide lays out the steps
Add Graphics Card to Your Laptop
Step 1: Determine Compatibility
First, make sure your laptop can take a new GPU. Not all can. Sometimes, the GPU is stuck on the motherboard. If your laptop has an MXM slot or can take an eGPU via a Thunderbolt 3 plug, you’re good to go.
- Physical space and cooling capacity.
- Compatibility with your laptop’s motherboard and BIOS.
- Power supply limitations.
- Operating system and driver support.
- MXM slots, found in gaming laptops and workstations, allow for easy GPU swaps. This means you can replace the current one with a better version.
- Thunderbolt 3 ports, which are getting usual in today’s laptops, are a great way to upgrade the GPU externally.
By connecting your laptop to a suitable eGPU enclosure, you can experience the robust graphics of a desktop computer.
Step 2: Prepare Tools and Backup
Here’s a detailed list of tools required for the graphics card upgrade process:
Tool Kit Item:
Precision Screwdrivers
You might need varied sizes and types of screwdrivers. Names like Phillips, flathead, and Torx might come up. These help to open and close your laptop, and its components .
Anti-static Wrist Strap:
This electronic shield. It keeps static electricity away from you.. This protects delicate electronics in your laptop from getting harmed.
Cleaning Supplies:
You’ll need a compressed air can or a tiny vacuum cleaner. These help to clean dust that gathers in your laptop and its parts. Your laptop stays cool when it’s clean.
A strong alcohol solution and a cloth that doesn’t shed fibers are also useful. You’ll need these to clean the thermal paste from your laptop’s processor units when you are upgrading.
Thermal Paste:
You’ll need quality thermal paste too. This helps to cool your laptop’s processor units when you bring in a new graphics card for upgrade.
Soft Cloth or Microfiber Cloth:
You should have this for handling and cleaning the various delicate parts safely. This helps to avoid any harm or scratches while you’re upgrading.
Container for Screws and Small Parts:
Small bowls, magnetic trays, or compartmentalized containers to organize and store screws and other small parts removed during disassembly, preventing loss or confusion.
Laptop Service Manual or Guide:
The manufacturer’s service manual or online guides specific to your laptop model, providing detailed instructions and diagrams for disassembly and reassembly.
Flashlight or Headlamp:
Provides additional illumination when working in dimly lit areas inside the laptop casing.
Plastic Spudger or Opening Tool:
Non-conductive tools for gently prying apart plastic clips or connectors without damaging the laptop’s casing or components.
Magnifying Glass or Loupe:
Optional but useful for inspecting small components, connectors, or labels with fine print during the upgrade process.
Grounding Mat or Surface:
Provides an anti-static work surface to further minimize the risk of electrostatic discharge when handling sensitive electronic components.
Tweezers:
You’ll need these sharp tweezers for small bits like screws and wires during any assembly project.
Step 3 Importance of Data Backup:
Data Backup: This keeps your files, both important and not-so-important ones, and videos safe. They won’t be lost due to faulty hardware, random deletion, or system breakdown.
Disaster Recovery: Things like computer viruses, ransom attacks, and natural disasters may happen. Having a backup will save you. You can get all your data back and be ready to roll again.
Peace of Mind: Relax: Knowing your worth-keeping data is all safe gives a peace of mind. It’s there when you need it.
Step 4 Opening the Laptop Case:
Power down your laptop and remove the battery to ensure safety during the installation process.
Refer to your laptop’s user manual for guidance on opening the back panel to access the internal components.
Step 5 Removing the Old Graphics Card:
Carefully remove the existing GPU from its slot, if present, by gently releasing any securing mechanisms.
Take note of any cables or connectors attached to the GPU and detach them accordingly.
Handle the components with care to avoid static discharge or physical damage.
Step 6 Install the new graphic card Process:
Install a new graphics card into the appropriate card slot, ensuring a secure fit.
Follow any specific instructions provided by the manufacturer to properly seat the GPU.
Attach all cables or connectors that were disconnected during the removal process.
Step 7 Closing the Laptop Case:
After your new graphics card is in, you can start putting the laptop back together. Close the back panel, and put the battery back. Now, turn it back on.
Get the newest drivers for your GPU. You get these from the maker’s website. Easy!
Adjust graphics settings as needed for optimal performance.
Step 8 Driver Updates:
Performance Optimization:
Updated drivers for your new graphics enhance hardware performance, ensuring smooth operation and optimal output in various tasks and applications.
Bug Fixes:
Driver updates resolve known issues, bugs, and compatibility glitches, enhancing system stability and reliability for uninterrupted usage.
Security Patches:
Drivers receive security updates to patch vulnerabilities, shielding your system from potential cyber threats and ensuring data protection.
Compatibility:
Always get the newest drivers. These will play nice with all your software and will help avoid any hiccups, making everything run super smooth!
How to Add an External Graphics Card with a Laptop

Understanding eGPU:
No internal GPU upgrade? No problem! Hook up an external graphics card (eGPU) through a Thunderbolt 3 Here’s how
Concept and Benefits:
eGPUs offer desktop-level graphics performance to laptops via Thunderbolt 3, enhancing gaming and productivity without internal upgrades.
Compatibility Check:
Verify laptop’s Thunderbolt 3 support and bandwidth to ensure compatibility with eGPU enclosures for seamless integration.
Choosing Components:
Select compatible eGPU enclosure and GPU based on budget, performance requirements, and compatibility with laptop and software. PCIe adapter/board: It is a motherboard fitted with a PCIe slot, HDMI ports, and numerous power alternatives.
Installation Steps:
Connect eGPU enclosure to laptop via Thunderbolt 3, install GPU, power up, and follow manufacturer’s instructions for setup.
Driver Installation:
First, Download the newest drivers for your eGPU box and GPU. You can take graphics card from the manufacturer’s website. This will keep everything running smooth and compatible
Configuring Settings:
Adjust graphics settings in operating systems and applications to utilize eGPU for enhanced gaming and productivity performance.
Test Performance:
Run benchmarks or test games to ensure the eGPU is functioning properly and delivering improved graphics performance.
Optimize Settings:
Fine-tune graphics settings in games and applications to take full advantage of the eGPU’s capabilities.
Enjoy Enhanced Performance:
With your eGPU set up and ready, your laptop’s gaming and work productivity will be on the upswing. Get ready to enjoy!.
.
Testing and Troubleshooting:
Testing Procedures:
Benchmarking: Using software like 3DMark to evaluate GPU performance.
Game Testing: Assessing gaming performance and monitoring frame rates.
Temperature Monitoring: Importance of monitoring laptop temperatures and using stress tests.
Troubleshooting Common Issues:
Driver Problems: Addressing graphical glitches and performance issues through driver updates.
Compatibility Issues: Dealing with compatibility challenges between the laptop and the new GPU.
Power Supply Concerns: Strategies for handling power-related issues post-upgrade.
Overheating Prevention: Tips for maintaining optimal laptop temperatures and mitigating heat-related issues.
BIOS Settings: Ensuring proper recognition and configuration of the new GPU in the laptop’s BIOS.
Manufacturer Support: Seeking assistance from the laptop manufacturer for persistent issues.
Benefits of Upgrading a Laptop’s GPU
Enhanced Performance:
Significant boost in laptop performance.
Newer GPUs feature advanced architectures and increased processing power.
Allows for smoother gameplay and faster rendering times.
Improved overall system responsiveness.
Improved Graphics Quality:
Higher graphical settings and resolutions enabled.
Increase visual quality in games and multimedia applications.
The colors are brighter, the textures more distinct, and the lighting looks real.
It’s like you are inside the game, literally.
Higher Frame Rates:
Greatly increases frame rates in games.
Provides smoother gameplay with reduced stuttering and lag.
Ensures fluid motion and responsive controls.
Even graphically demanding titles run smoothly.
Future-Proofing:
Ensures compatibility with upcoming game releases and software updates.
No more getting outdated and reduces the need for frequent upgrade laptops.
Allows for enjoying the latest gaming experiences without hardware limitations.
Multitasking Efficiency:
Your games run faster. Plus, you can do more tasks at once.
All software regarding streaming, video editing, and graphic design can run easily.
Do many things at once, and still keep the high speed.
Extended Lifespan:
Allows the laptop to meet the demands of modern software and games.
Extends the usable lifespan of the laptop.
Avoids the need for replacing the entire laptop, saving money in the long run.
Personalization and Customization:
Offers flexibility to customize the gaming experience according to preferences.
Allows adjustment of graphical settings and enables special effects.
Improves visuals and smooth gaming if needed.
Portability:
Makes big games work fast, away from home.
Uses the easy take-along of laptops to its advantage.
Play games on the go, with pals, or when chilling at home.
Frequently Ask Questions
Q1 Can I Add a Better Graphics Card to My Laptop?
Yes, you can indeed boost the quality of your laptop’s graphics card (GPU). The approach may be internal or external, largely affected by the model of the laptop and your selection.
Q2. How Much Graphics Card Do I Need for a Gaming Laptop?
The GPU power you seek hinges on few elements. For instance, the variety of games you enjoy, and the quality of graphics you wish to achieve. Research the recommended system requirements for your favorite games to determine the appropriate GPU specifications.
Q3. Can I Add an NVIDIA Graphics Card to My Laptop?
Yes, many laptops support NVIDIA graphics cards for internal or external GPU upgrades. Ensure compatibility with your laptop’s hardware and consult with the manufacturer for specific recommendations.
Q4. How to Install a New Graphics Card in Your Laptop
For installing a new graphics card in your laptop:
1. Confirm compatibility and upgradability.
2. Power off and disconnect all peripherals.
3. Remove bottom panel or access hatch.
4. Swap the old GPU with the new one.
5. Reassemble and install drivers.
Q5. Is Intel slower than AMD?
Intel and AMD offer competitive processors, each with strengths. Performance can vary based on specific models and tasks. Benchmarking and comparing specific CPUs are essential for determining speed and suitability for your needs.
Q6. How to use an external graphics card with a laptop
To make an external graphics card work with your laptop, just hook them up using a suitable port, like Thunderbolt 3. After that, you just need to install the right drivers and set up the system correctly and configure settings. Use an external monitor for display output for optimal performance.
Q7. How to Install a Graphics Card Into Your Windows PC
To install a graphics card into your Windows PC: 1. Power off and disconnect all cables. 2. Remove the side panel. 3. Locate the PCIe slot on the motherboard. 4. Gently insert the card. 5. Secure with screws. 6. Reconnect cables and power on.
Conclusion
Adding the graphics card in your laptop can unlock a new level of gaming performance and visual quality. Whether you choose to upgrade internally or opt for an external solution, careful consideration of compatibility and proper installation procedures are essential.
By following the steps outlined in this guide and consulting with your laptop’s manufacturer or a professional, you can successfully add a graphics card to your laptop and elevate your gaming experience to new heights.
Recommended Post
How Much Storage Should A Gaming Laptop Have